News Categories
Contact Us
020-86988980
- Guangzhou Sinoth Import and Export Co., LTD
Tel: 020-8968-8980
Website:www.gzsynoth.com
Email: belinda@dginfa.com(24 hours online)
Phone: +86 189 2740 6786
Address: No 5, Jinshi Three Street, Shiling Town, Huadu District,Guangzhou City, Guangdong Province
News
Current Location:Home > News > Industry information
What is CMM For CNC Machining And How Does it Work? (coordinate measuring machine)
Add Time:2025-09-16
What is a CMM for CNC Machining?
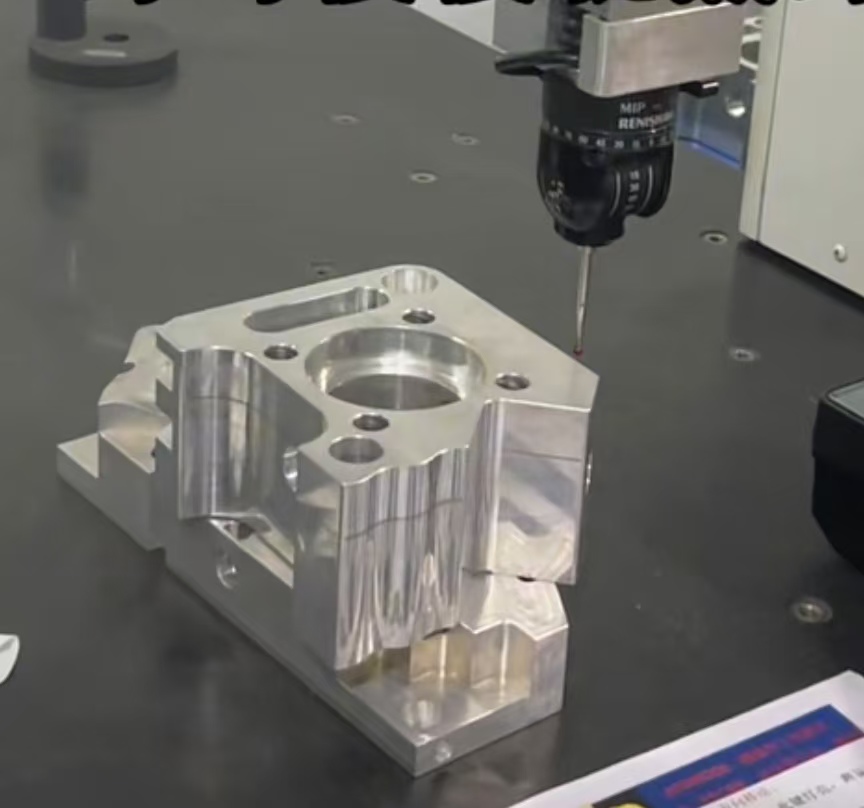
A Coordinate Measuring Machine (CMM) is a high-precision device used to measure the geometric dimensions and tolerances of CNC-machined parts, ensuring they match the design specifications (e.g., size, shape, position of features).
How Does a CMM Work?
 First. Part Setup: The CNC-machined part is fixed on the CMM's stable worktable (often using clamps or fixtures) to prevent movement during measurement.
Second. Probe Selection: A probe (contact or non-contact) is attached to the CMM's moving arm.
- Contact probes: Touch the part's surface directly to collect coordinate data (common for high accuracy).
- Non-contact probes: Use lasers, cameras, or optical sensors to scan the part without physical contact (faster for complex surfaces).
Third. Data Collection: The CMM's computer-controlled arm moves the probe along the part's features (e.g., holes, edges, surfaces). The probe records 3D coordinates (X, Y, Z axes) of hundreds/thousands of points.
Fourth. Data Analysis: The CMM's software compares the collected coordinates to the part's 3D design model (e.g., CAD file). It calculates deviations (e.g., if a hole is too small or a surface is uneven) and generates a report.
Fifth. Result Output: The report confirms whether the part meets quality standards (pass/fail) or identifies areas for CNC machining adjustments.
A Coordinate Measuring Machine (CMM) is a high-precision device used to measure the geometric dimensions and tolerances of CNC-machined parts, ensuring they match the design specifications (e.g., size, shape, position of features).
How Does a CMM Work?

Second. Probe Selection: A probe (contact or non-contact) is attached to the CMM's moving arm.
- Contact probes: Touch the part's surface directly to collect coordinate data (common for high accuracy).
- Non-contact probes: Use lasers, cameras, or optical sensors to scan the part without physical contact (faster for complex surfaces).
Third. Data Collection: The CMM's computer-controlled arm moves the probe along the part's features (e.g., holes, edges, surfaces). The probe records 3D coordinates (X, Y, Z axes) of hundreds/thousands of points.
Fourth. Data Analysis: The CMM's software compares the collected coordinates to the part's 3D design model (e.g., CAD file). It calculates deviations (e.g., if a hole is too small or a surface is uneven) and generates a report.
Fifth. Result Output: The report confirms whether the part meets quality standards (pass/fail) or identifies areas for CNC machining adjustments.
Previous : Sorry No data available


